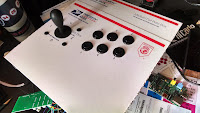
Friday, February 23, 2018

NeatReceipt Scanner Cleaning

So I was given this Neat Receipt scanner by a friend and I have to say I love it. Unfortunately they have moved away from hardware scanners and now focus more on cloud accounting software. I don't really use the software other than to create my files and this isn't a review of that anyway. 

Couple of notes before I start. First I am sure doing this will probably void any warranties, so proceed at your own discretion. Second the "Face Down" sticker in my pictures was put there by me to remember which way the papers go through.

I started running into the issue of scanning pages written in gel ink. As I like gel ink pens for the crisp lines they make. Some times I would blank and scan them freshly written and not dry and some times I guess I was not waiting long enough for the ink to dry before running them through the scanner. The problem it caused was it left ink on the scanner bar inside and would then put lines on everything I scanned. After looking on the web the only thing I could find was to buy cleaning paper and run it through but I figured that wouldn't work. 


So I figured out how to open the scanner and clean it myself and it really wasn't that difficult of a task so I thought I would share.

Firstly make sure you have the scanner unplugged from everything. Then flip the scanner upside down and there are 2 feet on the bottom. There are 3 screws to remove hidden under the feet. From the picture below there are 2 screws under the left foot and 1 under the right (upper half). See the arrow below.


Then once you have the screws removed I recommend grabbing the end without the USB connection and while applying inward presser on the top half and pulling down on the bottom half to start to open the casing. There are then 3 tab spots that need to be popped to fully open the case. (See the circles below) Be careful so as to not damage the scanner casing it should pry open gently.


Once you have all the tabs released the 2 halves will come apart. They are connected by a ribbon cable. (See circle below) It is your choice to pull the cable or not. You don't really need to if you don't want to. Just remember if you do to plug it back in before you put everything back together.


Once you have everything open you can now partly remove the roller and then get to the scanning glass to clean it. (See arrows below for where glass is) The roller easily removes on one post on the right the left does not. Once you remove that I recommend spraying a glass cleaner like Windex into a paper towel (not directly on/into the scanner) Then using the paper towel rub down the glass scanning surface.


Once you get the glass cleaned to your satisfaction you then reverse the process. First making sure the glass surface is dry. Then putting the roller back then reconnecting the ribbon cable if you removed it. Then slowly starting from one edge pressing the casing back together. You might have to push harder on some. Then you can re-insert the 3 screws in the bottom. Then go ahead and connect it and get back to scanning.

Wednesday, September 28, 2016

Raspberry Pi Arcade (Part 3)

So in Part 2 I described the building of the controls for the arcade. In Part 3 I will go over the making of the cabinet itself and the challenges faced. As with every step of this project I have learned a few things the hard way either because of a lack of knowledge of how to accomplish something or working with a material I have not worked with before, with that said I do recommend you accommodate for some "slop" when buying your materials specially if you are unsure how you will accomplish something exactly. I know this is not the best way to work on a project but it's how I handle most of my projects a wing and a prayer and my self proclaimed genius mind.

Pre-Build Recommendations:

  • If possible have as much of your projected planned out in advance. It will help with material and save time having to redo things if you either choose or are forced to changed you mind about something. 
  • Decide before your start if you want to round the edges like I decided to do or if you plan to put metal or plastic edging. Edging will require more work and you may want to tweak your sides to work better with it via corners and such.
  • Keep viewing angle in mind. That I would say is one thing I with I tweaked a little. My box is made to sit on a table and to be sat in front of. I wish I tweaked it slightly so you could stand it at better as well. 
  • Keep in mind that if you are making one for more than 1 player that they will have to stand side-by-side so think of that when coming up with your width and controller layouts. 
Building:

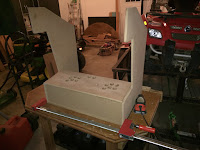
So as I mentioned I chose to use 1/2" MDF board. I chose this because of its weight which makes the unit somewhat portable. But also sturdy enough to be supported on its own. You could re-enforce the interior with support slats but I chose not to. The basic dimensions of my box turned out to be 27" tall 17" deep and 25" wide. I could trim some of the depth off but I wanted unquestioned stability which I think it has. I could also go shorter if I didn't have the upper marquee. I have already gone over the controller board so I will skip that part and show the side panels. I kind of free drew a side then cut it and used it to trace the cuts for a matching side. I then drilled a hole in each one for where I planned to place 2 side buttons. One thing to consider when designing your side panels is that you leave enough space under your controller panel for wiring and that you place some extra enforcement under it because it will be getting the most pressure from players leaning on it. I lacked this thought until afterward where I ended up installing a support post about middle of the controller board to prevent it from bowing and possibly breaking. 
Some build shots of the side panels and it mocked up with vices.

The next part of the build was cutting the back access door as well as a top and bottom. The next part was sanding all of the edges to smooth them out from the cuts and also because I chose not to use edging I rounded most of edges specially those by the controller so as to not cut players. I used an electric sander and just manually put a round on the edge. Was not very difficult as MDF edges sand pretty well. I used screws to attach the wood but there I learned another lesson and that is MDF loves to split when drilled into the sides. So if you do go with screws I highly recommend pilot holes almost the size of the screws or you run a very high risk of splitting your boards open. For the back panel I wanted an access door to all of components inside. To do this I chose a basic piano hinge and a basic key lock and cabinet handle. It was also at this time I decided I wanted to do a cool design on the top both for looks and to provide some venting. I settled on a Pac-Man themed design. I took pictures of Pac-Man and a ghost and blew the images up to the size I wanted and printed them. I then drew dots on the lines free hand which was then used as a pattern to drill into the wood. In all it ended up being 136 holes drilled by hand but I love how it turned out. 
(Probably my favorite feature of the entire build)

 I would ultimately like to put some LEDs behind the holes to light up Pac-Man and the ghost with their appropriate colors.  
Left is finished painted version. Right is finished version with light a behind some of it.
 I didn't have any shots of the key and handle before paint but here is the lock installed.


Painting:

The next phase was the one I think I hated the most..... Painting! I had figured this would be easy to paint because the MDF has a finished quality to it but I was wrong that or I suck hard at painting. I had seen other choose spray paint and I liked the thought so that is what I went with. The thing with MDF is that even if you paint with regular paint it loves to soak up paint and will require a few layers to get a quality finish. I think I applied at least 4 layers to each part that was painted. I then put a layer of gloss spray over it as well. I highly recommend if your not very familiar with the wood and paint that you try it out on some scrap pieces before you attack the project itself. Here are some shots of the project coming together paint wise.


Pac-Man Topper
 
I would ultimately like to have some arcade theme graphics on the sides but they have to be just right. What that means I am not sure so for now it will remain black. I think I will end Part 3 here. In Part 4 I will pick up with finishing the box frame and installing the monitor and other internal components.


PART 1
PART 2

Saturday, September 17, 2016

Raspberry Pi Arcade (Part 2)

I think the main focus for this post will be about the controls for the Arcade. There was a lot of effort put into getting them working, wired and laid out usefully. For starters I actually purchased the joysticks and buttons a year before starting this project. I got the whole set with controller board from X-Arcade They sell full button kits or you can get a piece at a time. I like the quality of their parts and don't have any complaints other than cable length which I will get into.

Pre-Layouts & Testing:
Once I decided on starting this project and decided on the Raspberry Pi as the PC I wanted to test out the buttons as I had never worked with them before and also make sure I could get them to work with the Pi. The one simple thing x-arcade did was the board treats the buttons and joysticks as a keyboard so pressing any of them is equal to pressing say W on a keyboard to go forward in a game.

Here are a couple of pics of the buttons and joysticks
  

So to test them I actually built them into an empty shipping box because it was stiff enough to not flex but light and thin enough to cut and move around. This method actually worked pretty well. I actually tried to test them just laid out on the table and that turned into a nightmare. Wires and buttons ever where.

Couple of pics of the cardboard testing board

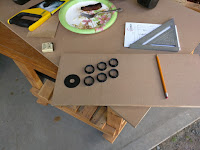
Once I had the buttons working with RetroPie I wanted to do a mock up using the MDF wood I decided to use. Again my reasoning behind this was it would give me an opportunity to work with the wood and discover anything to look for when doing the final build as I had not worked with MDF wood before. One of the main things I did discover when working with MDF wood is that when you drill your holes you need to have the board pressed against something (piece of scrap works) because if you just drill straight through MDF it likes to blow out on the backside which can cause some fitting issues. So I came up with the following which taught me a couple of lessons and let me see how well the buttons and everything fit in the MDF. 


Once I was satisfied with out everything was working I started on the final build. Obviously you can skip the test wood build as its not 100% necessary. The next step was to decide on a final layout. I started looking for arcade button layouts on the internet. You could just square them up but I find that layout unnatural and hard on the fingers when playing. Luckily I was able to find a website (Slagcoin) that has a lot of different "typical" arcade layouts. I settled on the following as I felt it was kind of a natural hand fit. So I took the layout and enlarged it until it fit the size scale of the buttons I was using. This gave me a template I could then put on the wood and start drilling from. 


Once I had my layout decided on and the MDF wood ready I set out to drill all the holes and attach/wire all the buttons. While trying to wire the buttons I learned that the wires they provided with the kit were just not long enough to allow a fit in the proper layout. (the issue I mentioned at the start) So I had to solder in wire extensions in to allow comfortable fit for everything. As the joystick needs to move you can't have the wires wrapped tight around the base. Also everything needs to reach the controller board which ends up being in-between the 2 sets of controls. 


It was while building the button layout I finally decided on what to do for the "Coin Slot". I knew trying to fit a traditional coin slot mechanism would be difficult and probably have to go on the side of the box which I did not like or want to do. While surfing for ideas I came across a button set that looks like a coin return button that lights up. I found them at Groovy Game Gear site. They actually have a couple of options for the face of the buttons. I decided that these buttons would go on the front below the arcade controls which is traditional of most arcade machines. Wiring the button presses in was nothing special but I decided to wire the lights together and then right to the Raspberry Pi GPIO (Pins 2"5V" & 6"GND"). That way when the pi was off the lights would turn off. 


In the next post I will be showing the actual build of the rest of the cabinet frame.


Thursday, September 1, 2016

Raspberry Pi Arcade (Part 1)

I have always been fascinated by making my own arcade for a long time and finally collected the parts needed to make my own. I wanted to make one with the following simple checks:

  • Bar Top or Glass Table design (settled on Bar Top)
  • Minimum 2 Players
  • Run by Raspberry Pi (started with B+ swapped in Pi2)
After reviewing a lot of other cabinets online I settled on what was to be my design. I wanted a marquee on the top and 2 sets of controls and an access panel on the back. The picture on the right was my first thought for a design but ultimately I changed my mind to the option on the left. I made for hiding some possible trouble spots easier and fit the material I wanted to use better. 

Final Choice--><--First Thought

I then had to decide on what type of material to use and I settled on 1/2" MDF board. I figured it to be strong enough to support the parts and still be light enough to be portable. I didn't have pre-written plans for drawing out the panels I had some general measurements based on part sizes and what seemed to make it more "comfortable". Below is the design I ended up with and I then just traced it over to make the other side panel. 


In the next post I plan to show further putting the arcade together and a lot on the layout of the controls. 

PART 2
PART 3

Tuesday, July 26, 2016

NewsRadio

The name of this site is a nod to the 90's sitcom NewsRadio (Specifically S05E08 Clash Of The Titans). If you have not seen the show I recommend you check it out. It is available to stream on Google Play and sometimes Crackle. The DVDs are also for sale at Amazon. Also if you are already a fan of the show I recommend checking out a Podcast called "Dispatches From Fort Awesome" a podcast about everything NewsRadio.